Oatmeal Addiction

Life can be simple one minute and crazy "busy" the next. It is spring break for my daughter. This whole Friday and Saturday has been spent on getting her ready to go to my Sisters' for the whole week. . .sniffle. . .and so we went shopping all Friday evening and then Saturday was "the trip". 2 hours down, several hours visiting, and 2 hours back. I have been too exhausted to get to blog and I feel terrible. There seems to be an addiction here. Life is not complete until blogging has been achieved. When did this become a "must do" on my list of daily things?

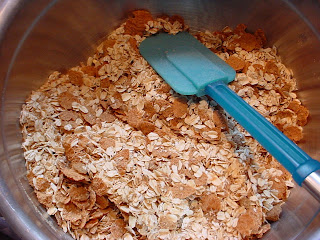
I decided that I must have a strange addiction to oatmeal for one simple reason. I made this granola and this is my lunch everyday for the last 2 weeks. The recipe takes 8 cups of oatmeal along with anything that your heart desires for extras. The granola also has wheat germ and bran flakes along with honey and brown sugar. The flavor was totally delicious over vanilla yogurt or by itself. I actually ate this whole batch of granola, minus 3/4 of a cup due to sharing with hubby, and have been craving it since. Okay, it has only been 2 days without my granola but I am now ready to make more! This time I am NOT going to stir the granola so much in the oven because I would like clusters and I am thinking that dried cherries and blueberries are the way to go along with pumpkin seeds, sun flower seeds, pecans, peanuts, and yogurt covered raisins. Last time I used dried cherries and apricots and I didn't enjoy the apricots as much as I thought I would. Going to the bulk section of the grocery store sure makes the cost of putting this recipe together inexpensive. I think I spent $6 total and filled 2 gallon sized ziploc bags full of granola. I found this recipe from a friend that goes by grizzlybear =).

Beautiful, Delicious Granola
Ingredients:


8 cups uncooked oatmeal
3 cups corn flakes or bran flakes
1 cup wheat germ
2 tsp. pure vanilla extract
2 tsp cinnamon
½ - 1 tsp. cloves & nutmeg mixed
¾ cup dark brown sugar
¾ cup canola oil
½ - ¾ cup honey
1 ½ cups water

Directions:

Mix all of the above ingredients in a very large baking pan so it can be spread out. Bake at 350 degrees for an hour, stirring every 15 minutes.

Add to the mix: 4 cups of nuts (raw sunflower seeds, raw pumpkin seeds, sliced almonds, chopped walnuts) and bake another 15 minutes.

Remove from the oven and add: 3 cups of dried fruit (raisins, craisins; apricots, candied papaya, candied pineapple – diced into small bits).

As the mix cools, stir it to be sure that the entire mix is cooled and dried out. Store in airtight container. Serve with yogurt.

Texas Tortilla Soup

The Pastry Queen by Rebecca Rather and alison oresman has this Texas Tortilla Soup that is out of this world! Okay, I bought avocados at Costco. . .dumb me. . .they ALL got ripe at the same time so I tried to make the slices extra thick for the garnish (WHICH the recipe DOES call for =D, only thin slices) and I figured it would be a great way to use up a couple of avocados, but if you make this soup. . .don't do it! To hard to cut up with a spoon. The recipe called for 3 cooked, shredded chicken breasts but I went and bought a garlic seasoned rotisserie chicken. I actually ate one of the legs off of it before I got to the shredding of the chicken. It used to bug the heck out of me that my grandma would stick her fingers in everything and taste (not a spoon. . .her fingers) before assembling whatever she was making and here I am ripping the 'ol chicken leg off and munching. I almost feel so guilty! I haven't blogged in days because I am having a little trauma with my teenage, only child, daughter and I just can't concentrate. She is such a sweetheart but high school can be rough and I guess I am a little over protective. What Mom isn't, right? So that is why I have been away for a few days. . .that and my chirping kitty. She wandered into our lives on a cold, stormy, rainy night as a kitten with no age and starving. She is now a no age, plump kitty and I made an appointment to get her fixed and nature kicked in and now I have to wait a month. Let's just say she does this chirping thing NON-STOP for the last two weeks and I am seriously thinking about resorting to a squirt bottle if she doesn't at least keep it to 15 minute increments instead of hours on end. She is adorable but OMG!


Okay, back to this awesome SOUP! I used my homemade stock but purchased chicken stock will work almost as well. I am so proud of myself for making my own stock that I just had to say that =D. The dried ancho chile is simmered in the stock before pureeing and when I made this soup, I deseeded the whole chili before pureeing. Next time, I will leave some of the seeds so that there is at least minimal heat. This soup is gorgeous because the garnishes have so much color and added flavor. . .which this soup doesn't need but only increases the attraction.


Texas Tortilla Soup

Ingredients:

8 plum tomatoes

4 T. olive oil

1 Medium-size yellow onion, diced

6 cloves garlic, minced

1 red bell pepper, diced

2 t. chili powder

2 t. ground cumin

4 c. chicken stock, preferably homemade

1 dried ancho chile pepper

1 (15-ounce) can peeled tomatoes

Salt and freshly ground black pepper

3 cooked, shredded chicken breasts

3 ears fresh corn or 1 (8-ounce) package frozen corn (optional but oh so worth it)

Garnishes:

2 ripe avocados, peeled and sliced

Tortilla chips or strips

2 plum tomatoes, diced

1/4 c. chopped fresh cilantro

1 c. shredded Monterrey Jack cheese

Sour Cream (optional)

Directions:

To Make the Soup: Preheat the oven to 350 degrees F. Slice the tomatoes in half. Spread 1 tablespoon of the olive oil on a baking sheet or pizza pan and arrange the tomatoes on top, skin side up. Drizzle the tomatoes with another 1 tablespoon of the olive oil Roast the tomatoes for 25 to 35 minutes, until the skins wrinkle and the tomatoes are slightly brown around the edges.

Heat the remaining 2 tablespoons oil in a heavy-bottomed, 4-quart soup pot over medium heat. Add the onion, garlic, and bell pepper and saute about 5 minutes, until the vegetables become soft. Stir in the chili powder and cumin and cook for 1 minute. Add the chicken stock and ancho chile. Bring to a boil over medium-high heat, then cover, decrease the heat, and simmer about 15 minutes, until the ancho chile softens. Remove the chile from the soup and pull off and discard the stem. Cut the chile in half and discard the seeds, if desired. (Leaving the seeds in makes for a spicier soup.) Place the softened chile, the canned tomatoes with their juices, and the roasted tomatoes (including as much of the juices and browned tomato bits as possible) in the bowl of a food processor fitted with a metal blade. Puree the chile-tomato mixture about 1 minute. Transfer the chile-tomato mixture to the soup and continue simmering, covered, about 1 hour. Add salt and pepper to taste, along with the cooked chicken, If using fresh cor,m, cut the kernels from the cobs, add the corn to the soup, and simmer for 5 minutes.

To Garnish the Soup: Ladle the soup into medium bowls. Lean 3 to 4 slices of avocado against the edge of each bowl, partially sticking out of the soup. Arrange the tortilla chips or strips in a similar way. Sprinkle each bowl with a handful of diced tomatoes, some cilantro, and 2 tablespoons of shredded cheese. Top with a spoonful of sour cream. Serve immediately.

Pacific Northwest Shrimp Quesadillas

I love the idea of using fresh fruit in my dinner along with seafood. I just learned to use my griddle when making quesadillas! How easy and simple. How come I didn't think of this before? While looking through some cookbooks a while back, I ran across this idea and it became one of my famous "DUH!" moments. So, Shrimp Quesadillas it is. Easy, a little spicy, and delicious. Did I mention finger food that is a little messy too? Yes, you have to scoop the mango salsa onto your quesadilla to get the full affect, but then, you are allowed to use a spoon for this endeavor. Dinner and a puzzle! How can you possibly go wrong?

Okay, my next great news is that I just purchased a new camera with hubby! Yay for me! It is the Canon digital EOS Rebel XT and has changable lens so I can now spend more money purchasing the right lens for wide angle shots. I also have photoshop and canon photoshop. They both seem to have points I do like and points that confuse the hell out of me. I have been trying to figure these programs out (Yes, I have been reading the manual somewhat too =D) and I have managed to freeze the computer up, delete 2 awesome pictures and permanently mess up another! On the good note? The messed up picture is REALLY clear! I set the camera down by where I was cooking in the kitchen (of course I was cooking in the kitchen. . .silly statement) and my hubby hyperventilated! You see, I forgot to put the protective lens cover back onto the lens and there was flour dust on the glass. Did I mention that I forgot to purchase a chamois? With this new toy, I think my hubby has demoted me to kid stature. Don't do that. . .Do this! Don't hold it like that. . .here. Let me show you how it is done. . .while he is taking the camera out of my hands and taking pictures of food all over the kitchen because he has no idea WHAT I am trying to take a picture of and is being too stubborn to ask. How's that for long-winded? Okay, I am done whining. Promise. Off to bigger and better subjects.

I just found out my sister belongs to a food co-op and can get Tahitian Vanilla Beans for about $1 per bean. I had to buy 27 vanilla beans, but who is counting? The aroma that emitted from the now unsealed bag was intoxicating! OMGoodness! The beans were plump. . .even though they were dried just like the ones in the grocery store AND they were about 8-inches long! Beautiful and perfect. Bring on the custards and ice cream recipes, hhhhmmm, okay, any recipe. We'll adapt. I also ordered pink peppercorns but they are on backorder. Slightly bummed over that one. It's okay though because I am worried over the fact that when I do get them, I'll have to figure out how to store them. You see, the smallest amount that I could purchase came to 5 1/2 c. When I die, my grandchildren will be inheriting my spices. What I am going to do with 5 1/2 c. of peppercorns, I have NO idea! It might be fun trying though! =D

Well, I think you have waited long enough to get to this fun little dinner, or lunch. Okay, it could work for breakfast.

Pacific Northwest Shrimp Quesadillas
Mango Salsa:
2 Mangoes, diced
1 fresh jalapeno chile, stemmed, seeded, and finely diced
1/2 medium-size red onion, diced
1 T. freshly squeezed lime juice
1/4 t. salt
1/4 c. bottled Thai-style chili sauce
2 cloves garlic, minced
2 T. chopped fresh cilantro

Quesadillas Ingredients:
1 pound uncooked large shrimp, peeled and deveined
1 t. salt
1/4 t. cayenne pepper
2 T. olive oil
1 medium-size yellow onion, sliced
Dash of Worcestershire sauce
Dash of hot pepper sauce, such as Tabasco
1 red bell pepper, cut into 1/2-inch slices
Salt and freshly ground black pepper
8 (8-inch-diameter) flour tortillas
2 c. shredded Monterey Jack Cheese

Directions:
To make the Salsa: Combine the mango, jalapeno, onion, lime juice, salt, chili sauce, garlic, and cilantro in a medium bowl. Cover and refrigerate for up to 2 days or until ready to serve.
To make the Quesadillas: Rub the shrimp evenly with salt and cayenne. In a large saute pan, spray with a non-stick cooking spray and set over medium-high heat, saute the shrimp 1 to 3 minutes, until they curl and turn pink. Remove the shrimp from the heat and set aside in a large bowl.
In a separate saute pan, heat the oil over medium heat. Add the onion, Worcestershire sauce, and hot sauce and saute about 5 minutes. Add the bell pepper and continue cooking about 5 minutes longer, until the onions are brown and caramelized. Remove the onion mixture from the heat and stir in salt and pepper to taste.
Coat a griddle or large saute pan with cooking spray or a thin layer of olive oil and place it over medium-high heat. Once the griddle is hot, arrange 2 tortillas in a single layer. Sprinkle 1/2 c. cheese evenly over each. In another large saute pan or if there is room on the griddle, arrange 2 more tortillas and divide the shrimp mixture among them. Once the cheese has melted, flip the cheese tortillas over onto the shrimp tortillas, making 2 quesadillas. If you don't have enough room on the griddle or on the stove top to work with 2 pans simultaneously, wait until the cheese has melted on the first 2 tortillas, top the cheese with the shrimp mixture, and then cover with the other two tortillas. Cook them, flipping occasionally, until they are golden brown and crispy on both sides, about 5 minutes total. Repeat for the remaining tortillas and filling. Cut the quesadillas into quarters and transfer them to serving plates. Serve immediately with the mango salsa.

Ceasar Salad Pizzas and Margaritas

I have been good getting my goals accomplished for the last week so I wanted to treat myself. I have not been having quite enough time to get all my things that I write down on little scraps of paper during the day (at work) done. I write my ideas down for what I want to get accomplished or things that I forgot to do the night before and I get this second wind as soon as I get into the door. The problem is. . .I always run out of time! Before I know it, the night has gotten a LOT later then I was hoping before I slipped into the covers and actually gotten the required amount of sleep. . .whatever that is. . .I'm not sure anymore =D. What I want to know is this: Are people who really enjoy cooking over-achievers? Many of us work full-time and have responsibilities besides coming home and making the next new and fresh creations AND take the time to blog about it. So - what does this mean? I was accused of showing someone up at work because I come in with a plateful of goodies about once a week. I say, it all comes down to what you truly wish to make quality time for. . .yes? No? I am exhausted at night BUT it is a good exhaustion. Everyone goes to bed happy and with a full tummy. Isn't that what cooking is all about? Creating and using artistic ideas then sharing those dishes with your loved ones?
My family loves salads and pizzas. I try not to make the pizzas to often but this pizza is soo good and I think that it also isn't to bad for you. Combining the salad and pizza means having two of my favorite foods with half of the guilt. I originally found this recipe in the Pastry Queen by Rebecca Rather. The crust is chewy and crunchy. The toppings can be anything that you can put your mind to for a unique or original creation! =D

Caesar Salad Pizzas
Crust:
1 1/2 c. lukewarm water (110 to 115 degrees F.)
2 (1-ounce) packages active dry yeast
2 T. olive oil, plus additional for brushing on crusts
2 t. honey
4 to 5 c. all-purpose flour
3 T. semolina flour (optional)
1 t. sea salt
1/2 t. crushed red pepper flakes (optional)
1/4 c. coarse cornmeal
1 c. freshly shredded Parmesan cheese

Dressing:

2 cloves garlic, minced

1 anchovy fillet (optional)

2 large eggs, beaten, or 1/2 c. pasteurized egg product

1/2 c. freshly squeezed lemon juice

2 t. Worcestershire sauce

2 t. Dijon mustard

1 c. extra-virgin olive oil

1 1/2 c. freshly grated Parmesan cheese

Salt and freshly ground black pepper

Salad:

1 large head romaine lettuce, washed and cut into 1 1/2-inch slices

1 pint organic cherry tomatoes, halved (optional)

Butter and Garlic Croutons (optional)

Freshly shaved Parmesan cheese, for garnish (optional)


Directions: To make the crust: Combine the lukewarm water, yeast, olive oil, and honey in the bowl of a mixer fitted with a dough hook. Add 3 cups of the all-purpose flour, the semolina flour, salt, and crushed red pepper; mix on low speed. With the machine running, add 1 cup of the all-purpose flour to make a soft dough. Mix the dough on low speed about 5 minutes longer, until smooth. Add up to 1 more cup of the all-purpose flour as necessary to keep the dough from sticking to the bowl.


Turn the dough out onto a floured surface and knead until smooth and elastic, about 10 to 15 turns. Place in a large oiled bowl. Cover and let rest at room temperature for 30 to 40 minutes.

Generously coat 2 baking sheets with olive oil. Sprinkle the sheets with cornmeal. Preheat the oven to 450 degrees F. (If you have a pizza stone, use it instead of the baking sheets, preheating it along with the oven. No need to grease the stone, just sprinkle it with cornmeal just before you bake the pizzas.)

Divide the dough into quarters. Roll each piece into a ball, place the dough balls on a baking sheet, cover with a damp towel, and let rest for 10 to 15 minutes longer. Use immediately, or cover with plastic wrap and refrigerate up to 3 hours.

Using a floured rolling pin, flatten each dough ball into an 8-inch circle. Brush each dough round with olive oil and sprinkle each with 1/4 cup Parmesan cheese. Transfer the crusts onto the prepared baking sheets and bake for 10 to 15 minutes, until browned and crisp.

To Make the Dressing: Place the garlic, anchovy, eggs, lemon juice, Worcestershire sauce and mustard in the bowl of a food processor fitted with a metal blade or in a blender. Process until smooth. With the processor or blender running, add the olive oil through the feed tube or lid opening, if it is the blender, in a thin, steady stream. Pour the dressing into a bowl, stir in the Parmesan cheese, and season to taste with salt and pepper.

To Make the Salad: Toss the lettuce and tomatoes with the dressing. Place a generous amount of salad on top of each warm pizza crust. Garnish with shaved Parmesan cheese, croutons, and dressing. Serve flat like a tostada.

The Real Deal Margaritas
Ingredients:
1 lime, halved
Kosher salt
5 limes - freshly squeezed
1 lemon - freshly squeezed
1 c. Triple Sec
1 c. white tequila
2 c. ice plus extra for the cocktail shaker

Directions: If you enjoy salt on the rims of your margarita glass, slide a cut lime around the rim of the glass and lightly dip into a plate of kosher salt.
Combine the lime juice, lemon juice, Triple Sec, tequila, and ice in a blender and puree. Place extra ice in a cocktail shaker. Fill with the margarita mix in the blender, shake well, and strain into glasses.

Late St Paddy's Day

I just couldn't stand not being able to participate in St. Paddy's Day and I know I should have been better at planning but sometimes it is just not meant to be. Well, Here is my bottle of Irish Style Lager beer and a toasted Rueben. I absolutely LOVE the homemade dressing that resembles Thousand Island only with much more kick and flavor! These Ruebens are an all time favorite and soooo easy to make. Try to buy good sauerkraut and I definitely use dark rye bread. Unforetunately, I made these late so there was NO dark rye bread available for me to purchase. That's okay because this Rye bread worked just fine. Be generous with the Thousand Island type mixture too. I can't even squeak after eating one of these sandwiches! This makes 4 sandwiches so we had leftovers for lunch the next day =D.

Toasted Ruebens
Ingredients:
1/2 c. mayonnaise
3 T. ketchup
2 T. sweet pickle relish
1 T. prepared horseradish
4 t. prepared mustard
8 slices dark rye bread
1 pound thinly sliced deli corned beef
8 slices Swiss cheese
1 can or bag from deli case of sauerkraut, well drained
2 T. butter

Directions:
In a small bowl, combine the mayonnaise, ketchup, pickle relish and horseradish; set aside. Spread mustard on one side of four slices of bread, then layer with the corned beef, cheese, sauerkraut and mayonnaise mixture; top with remaining bread.

In a large skillet, melt butter over medium heat. Add sandwiches; cover and cook on both sides until bread is lightly toasted and cheese is melted. Serve with LARGE pickle and a side of french fries. A true eating experience!

Cream and Sugar Slave


Fluffy already ate mine!


I'll give you 3 guesses before I show you just what this is! Hint: Keep the guesses simple and you'll get it =D! I finished my college finals FINALLY and I am back to cooking. . .what I truly enjoy! I went to the store last night and the check-out girl asked me what I was taking for college. When I told her, she said "How Boring". I went home a little bummed because she is right. I am getting a Bachelor's Degree in Administration and my classes are not exactly hair-raising excitement! Just when I started asking myself why I was doing this still. . .2 1/2 years later. . .my Mom calls and sets matters straight. Yes, cooking is a total blast and all I want to think about but I am also an adult and I have to finish my journey. It is not a mistake unless I quit. Maybe it was the 22 hours of homework I put in over the weekend, which included Monday night after work, that was talking but Mom is always great for setting things straight.


In the meantime, Mom wanted a simple dessert that would look dramatic. She is a personal trainer that loves sweets! Dad swears he is going to have to put a lock around the oven so she'll stop baking because he just can't handle all the goodies she makes and "how the heck are her clients suppose to believe she is serious about what she preaches at the gym when she is talking to them about the newest and best giant cookies that she just baked earlier?" How do you not just LOVE her? I have just got to put together a fun baking basket of goodies and send it to her as a surprise. I think it would be a blast to put together!

My other bummer? I missed St. Paddy's Day because of my finals. I had my menu all ready and ran out of time. Hubby made dinner for him and Ashley. I'm making St. Paddy's Day dinner tonight. . .and I am going to be defiant and blog about it tomorrow. . .just like I never missed anything. Oh, oh, and what is worse. . .I am thumbing through a cooking magazine (Cuisine at Home) trying to find this recipe for Mexican Pork roast that is roasted in a banana leaf (because tonight I just found frozen banana leaves at a new Mexican Grocery Store when coming home from work) AND would you believe that I found an even BETTER St. Paddy's Day Dinner? Reuben Egg Roll Wraps with Thousand Island dipping sauce and an Iced Irish Coffee made with coffee, Irish whiskey, chocolate syrup and heavy cream. I can't believe! I am at a twist in the road here! I want to make that too BUT I already have REALLY ripe avocados and I have a tortilla soup planned for tomorrow night's dinner. Ingredients have already been checked twice, etc. Hhhm, make two dinners? I have been known to do this in the past. Don't ask. . .my poor hubby just shakes his head and says great leftovers for the week.


OKAY . . .HERE IT IS . . . Cream And Sugar Slave
The basic ingredients for this primordial gooey dessert are cream and sugar.
My new thing: experimenting with cream and sugar to see what new concoctions I can come up with to dollop on-top of a wonderful creation or be able to serve with fresh fruit that is currently in season. This wonderful creation, that I can not take full credit for, but actually came out of the Gooey Desserts Cookbook by Elaine Corn is cream and sugar layered with brown sugar sandwiched in-between. The best part? This brown sugar thickens into a faux caramel after sitting for 24 hours in the refrigerator! Did I mention Delicious?! The creamy texture is amazing good, light and fluffy. The faux caramel. . .perfectly sweet and swirled in among the cream and sugar.


Ingredients:
1 c. cream
1/2 t. pure vanilla extract
1/2 c. sour cream (or creme fraiche)
About 3/4 c. dark brown sugar
Optional raspberries, blueberries, strawberries, bananas, or other fruit in season =D

Directions:

In a cold bowl and using cold beaters, whip the cream and vanilla only to medium-stiff peaks. Fold in sour cream. Spoon half the cream mixture into individual dessert dishes or goblets, or into one 6-cup bowl, such as a souffle dish.

Sieve half the brown sugar over the cream. Cover with remaining cream. Sieve the rest of the sugar on top. Refrigerate. In 24 hours, brown sugar will "caramelize." At serving, top with fruit, or eat plain.

Note: This cream is delicious plain as a dessert topping instead of sweetened whipped cream. The slight tartness created by the sour cream is a balancing contrast for extremely sweet desserts.


The Mini Pie Revolution


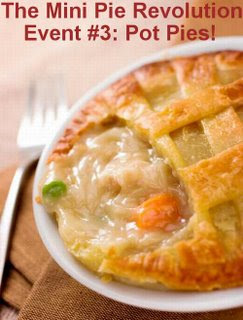
I absolutely LOVE little pies of any sort. I am digging through my shelves of baking dishes, all well loved, to find that I do not have enough of the same size ramekins for my chicken pot pies. I am not surprised. When I go shopping unexpectedly, you know, there is always an ingredient I am looking for and I have to go to ten-buck-two to find this ingredient because it is a must have for this new dish, well anyways, I inevidably run into a sale on bake ware and there is just a few left. Of course I should walk away but. . .I don't. Now I have a kitchen full of odd numbers in sets. Personally, I think it just adds to the homey and well-loved feeling when sharing something made from scratch with family and friends. What better friends then my fellow cooking friends here at the mini pot pie event!

I really got into making these little pies. I started by making my own homemade chicken stock. 5 quarts of this wonderfully chicken flavored stock is now measured, and set in Ziploc bags in my freezer. I keep peeking in the freezer in disbelief. The disbelief is because I did this during a weeknight. I get home from work around 5 p.m. right now (along with having to get up at 4 a.m. to go to work), put everything together and forgot that this particular stock takes about 7 hours to cook. I stayed up till 2 a.m. so that I could cool the stock enough to put it into the refrigerator. Alton Brown, on the Food Network, had a great idea of setting bottles of frozen water into the middle of the pan when putting everything into the refrigerator to fully cool. This way, the stock cools quickly and evenly. Then I can just peel the jelled grease from the top of the stock and measure out to freeze. Easy.
I love my pot pie crust. The reason is because the crust has butter AND cream cheese. . .no sugar. The cream sauce is created from chicken stock, flour, and heavy cream along with butter and seasoning. Quick and easy. The filling ingredients are fun because, well, how can you go wrong with a group of ingredients that you can continually change according to what you have on hand in the refrigerator? For this pot pie, I bought a garlic rotisserie chicken and just shredded the meat. My big short-cut. =).
Creamy, Chunky, Chicken Pot Pies
Filling Ingredients:
3 T. unsalted butter
1 medium-size yellow onion, chopped
1 large russet potato, peeled and diced
3 cloves garlic, minced
1 red bell pepper, diced
8 ounces button mushrooms, sliced
1/2 t. crushed red pepper flakes
Salt and freshly ground black pepper
1 purchased cooked rotisserie chicken or 1 whole stewed chicken, cooled (See note at end of recipe)
8 ounces fresh green beans, cut into 1-inch pieces (optional)
1 (8-ounce) package frozen peas (optional)
Cream Sauce Ingredients:
1/2 c. (1 stick) unsalted butter
1 c. all-purpose flour
2 1/2 c. chicken stock, preferably homemade
1/2 c. heavy whipping cream (optional)
Dash of hot pepper sauce, such as Tabasco
Salt and freshly ground pepper
Crust Ingredients:
1 c. (2 sticks) chilled unsalted butter
3 c. all-purpose flour
10 ounces chilled cream cheese
1 t. salt 1/4 t. freshly ground white pepper
1 large egg
Directions to Make the Filling: Melt the butter in a large saute pan set over medium heat. Add the onion and potato; saute for 5 minutes. Add garlic, bell pepper, and mushrooms and saute about 15 minutes, until the potatoes are tender. Stir in the crushed red pepper and add salt and pepper to taste.
While the vegetables are sauteing, skin the chicken, pull the meat off the bones, and shred the meat or cut into bite-size pieces. Place the green beans in a microwave-safe bowl and add enough water to cover. Cover the dish and microwave on high power about 10 minutes, until the beans are tender. Drain thoroughly. Stir the beans, peas, and chicken into the vegetable mixture. Set the filling aside.
To Make the Cream Sauce:
Melt the butter over medium heat in a large saucepan. Add the flour and whisk until smooth. Whisk in the chicken stock and cook the sauce over medium heat until it thickens to the consistency of a cream soup. Add the cream, hot pepper sauce, and salt and white pepper to taste. Pour the cream sauce over the chicken filling and stir to combine. Fill individual 1 1/4-cup capacity oven-safe bowls three-quarters of the way to the top with the creamed chicken filling.
To Make the Crust:
Preheat the oven to 375 degrees F. Cut the butter into 16 pieces. In the bowl of a food processor fitted with a metal blade, pulse the butter and flour until crumbly. Add the cream cheese, salt, and white pepper. Continue pulsing just until the dough forms a ball.
Set the dough on a flat surface dusted with flour. Use a floured rolling pin to roll the dough out to 1/4-inch thickness. Measure the diameter of the pot pie bowls--mine are about 4 inches across- -and cut out dough rounds that are 1 1/2-inches larger in diameter. Whisk the egg in a small bowl. Lay the dough rounds on top of the pot pies, making sure the dough hangs evenly over each bowl. Brush the dough lightly with the beaten egg. Bake the pies for 20 to 25 minutes, until golden brown. Serve immediately.
***NOTE***
You can use a whole stewing chicken with 2 carrots, unpeeled, cut in half, 2 stalks of celery, cut in half, 10 whole peppercorns, and 5 quarts of water in a large stockpot and bring to boil over high heat. Decrease the heat to medium-low and simmer the stock for 1-hour, uncovered. (The liquid level should drop by about 1-inch.) Turn the heat as low as possible and simmer uncovered for at least 2 hours. Now you have your stock and chicken meat for the pot pies.
***NOTE 2***
I make extra pot pies, double wrap them with plastic wrap or use a large Ziploc bag and pop them into the freezer. I can take any amount out and bake in a 350 degree F. oven for 30 minutes and waalaa! Dinner is served! =D

Kitchen Parade's Pi Day - Southern Comfort Apple Pie, Cinnamon Ice Cream, and Spiked Caramel Sauce


I am a little to rumdum to think straight enough in figuring out how to be as brilliant as others that precede me for dialog and pie or Pi. I would love to know the absolute circumference of my circle for the pie dish, make this outstanding algebraic equation for the exact amount of apple slices that will make up the ultimate filling per square inch of the pie shell inserted into the pie dish. . .but I really must say I am sorry because my first concern tonight is how to unscorch one of my favorite cookbooks. I guess I am tired. Long day. I came home and decided that I wanted to de-crystallize my honey collection. Maybe I am the only one out here that has this huge collection of honey with only marginal amounts in each container left WHICH has now crystallized and is in dyer need of hot liquid to re-liquefy this solid mass. Hhhmmm, there may be an equation in here yet. So, I take off my construction boots and turn on the teapot (full of water that I get hot, take off the burner and set a bottle of hard honey into) and open up one of my favorite cookbooks, pages down, on the front of my stove. Well guess what? I turned on the front burner instead of the back burner to the teapot and cooked by cookbook. I caught the error after dark smoke started emitting from the pages. I now have these lovely large, round, ugly burn rings on about 6 pages. If it wasn't for the glossy pictures, the whole cookbook would already be in flames. The good news? I can still read the recipe behind the ugly burn rings. I feel ill.
Okay, my pie and pie crust of choice. . .I used to struggle with crunchy apples in my apple pie. I absolutely LOVE mounted apple pie but I would over think the baking time and take my pie out too soon. . .every time! Frustrated, I started sauteing my apples before putting them into a pie crust. Then I found the Pastry Queen cookbook and all is well. This pie is family and friends all-time favorite pie EVER and the cinnamon ice cream on top is a great treat. Thank you Kitchen Parade for bringing about this fantastic event. The collection of pie recipes already submitted are mouth-watering to just read the titles!

My creation took 2 days to put together because I made a cinnamon custard that is later made into an ice cream before assembling the pie. I must have been tired the day before yesterday, too, because I ruined the first batch of custard by having the heat to high. Nothing like curdled custard. BTW, I now have 18 egg whites in my refrigerator to use up =).

My pie crust is easy to work with and I love the fact that I can just throw it into the refrigerator one day and make my pie the next. Also, there is a couple of Tablespoons of sugar in the crust to give a little sweetness and when I want, I add other spices like cinnamon or vanilla flavored sugar for an added twist. The pie is delicious served topped with cinnamon ice cream, and/or rum-spiked Caramel Sauce. My hubby especially loves this pie with both ice cream and caramel. He is not a big sweets kind of person and he would eat this pie for dessert every night of the week if I baked it for him. I love the flavor mix and texture, myself. This is actually a lot of fun to put together. . .even after making a quite a few over time.


Cinnamon Ice Cream

2 c. half-and-half
2 c. heavy cream
1/2 vanilla bean, split lengthwise
1 cinnamon stick
9 egg yolks
3/4 c. sugar

Directions:
In a saucepan over medium heat, heat the half-and-half, cream, vanilla, cinnamon stick and ground cinnamon, whisking occasionally to make sure the mixture doesn't burn or stick to the bottom of the pan. When the cream mixture reaches a fast simmer (do not let it boil), turn off the heat and let the flavors infuse for 10 minutes.


Whisk together the egg yolks and the sugar. In a thin stream, whisk half of the cream mixture into the egg yolk mixture. Then pour the egg-cream mixture back into the saucepan containing the rest of the cream mixture. Heat over medium heat, stirring constantly with a wooden spoon. At 160 degrees, the mixture will give off a puff of steam. When the mixture reaches 180 degrees it will be thickened and creamy, like eggnog. If you don't have a thermometer, test it by dipping a wooden spoon into the mixture. Run your finger down the back of the spoon. If the strip remains clear, the mixture is ready; if the edges blur, the mixture is not quite thick enough yet. When it is ready, quickly remove it from the heat.


Meanwhile, in a bowl, put two handfuls of ice cubes in the bottom, and add cold water to cover. Rest a smaller bowl in the ice water. Pour the cream mixture through a fine sieve (to remove the vanilla bean pieces and cinnamon sticks) and into the smaller bowl. Chill 3 hours, then continue according to the directions of your ice cream maker.


Southern Comfort Apple Pie

Topping:

1/2 c. pecans
1/3 c. granulated sugar
3 T. firmly packed dark brown sugar
1/2 t. ground cinnamon
1/4 t. salt
1/3 c. all-purpose flour
1/3 c. (5 1/3 T.) chilled unsalted butter

Pie Crust:
2 c. all-purpose flour
1/2 t. salt
2 T. sugar
2/3 c. (11 Tablespoons) chilled unsalted butter
4 to 5 Tablespoons ice water

Apple Filling:
5 to 6 medium-size tart apples, such as Granny Smith, Braeburn, or Winesap
1/2 c. (1 stick) unsalted butter
3 T. cinnamon
1 c. sugar
3/4 c. Southern Comfort liqueur
1/2 c. heavy whipping cream

Caramel Sauce:
1 c. sugar
1/4 c. (1/2 stick) unsalted butter
3/4 c. chilled heavy whipping cream
Pinch of salt
2 T. dark rum, such as Myers's (optional)

Directions:
To make the topping: Preheat the oven to 350 degrees F. Arrange the pecans on a baking sheet in a single layer and toast them in the oven for 7 to 9 minutes, until golden brown and aromatic. Coarsely chop the nuts.

In a food processor fitted with a metal blade, process both sugars, the cinnamon, salt, and flour for about 1 minute. Cut the butter into small pieces and add to the sugar-flour mixture. Pulse about 10 to 15 times, until the mixture is crumbly. Stir in the pecans. Refrigerate the topping covered, in a medium bowl until ready to use.

To making the pie crust: Preheat the oven to 425 degrees F. Using a mixer fitted with a paddle attachment, combine the flour, salt, and sugar on low speed about 30 seconds. Cut the chilled butter into 1/2-inch cubes. Add the butter to the flour mixture and combine on low speed about 1 to 1 1/2 minutes, until the mixture looks crumbly, with bits of dough the size of peas. Add 4 Tablespoons ice water, 1 Tablespoon at a time, mixing on low speed for 10 seconds after each addition. After the last addition, the dough should begin to clump together in a ball. If it doesn't, continue mixing about 10 seconds longer. If it still looks too dry, add an additional 1 Tablespoon ice water. Gently mold the dough into a disk, wrap in plastic wrap, and refrigerate at least 1 hour.

Line a 9-inch deep-dish pie plate with the pie dough. Press it into place and crimp the outside edges with your fingers or a fork. Set aside.

To make the filling: Increase the oven temperature to 375 degrees F. Peel, core, and cut the apples into 1/4-inch-thick slices. Melt the butter in a large skillet over medium-high heat. When the butter starts to foam, add the apples and saute for 5 to 8 minutes. In a small bowl, stir together the cinnamon and sugar; sprinkle it on the apples and stir to combine. Simmer the apples over medium-low heat about 1 minute longer. Remove the apples from the skillet with a slotted spoon, leaving as much of the butter-sugar mixture in the skillet as possible. Transfer the apples to a baking sheet and arrange in a single layer. (If heaped in a pile, the hot apples will steam-cook and become soggy.)

Pour the Southern Comfort into the butter-sugar mixture in the skillet. Simmer the mixture over medium heat at least 5 minutes, until the alcohol burns off (carefully sniff the mixture at close range; if it burns the insides of your nostrils, the vapors are still burning off). Add the cream and continue cooking about 8 to 10 minutes, until the mixture is as thick as pourable caramel. Return the apples to the skillet.


Pour the apple filling into the unbaked pie crust and sprinkle the topping evenly over the apples. Bake for 50 to 60 minutes, until the filling is bubbling and the topping is brown. Serve the pie warm or at room temperature.


NOTE: Excess pie crust scraps are excellent rolled out and dusted generously with cinnamon and sugar mix. Pop them into the oven at 425 degrees F. for 10 minutes, until brown on the edges. They never last in my house past the first day.

To make the Caramel Sauce: Heat the sugar over medium heat in a heavy-duty saucepan or iron skillet until it is completely melted and turns amber in color, about 5 minutes. Decrease the heat to low, add the butter all at once, and stir to combine. (It will bubble up.) Add the cream, a couple of Tablespoons at a time, stirring to combine between each addition. Adding the cream slowly keeps the caramel from clumping. Continue stirring until the caramel sauce is melted and smooth. Remove from the heat and stir in the rum. You'll have about 1 1/2 cups of caramel sauce. Caramel can be stored in a covered glass container in the refrigerator for up to 3 weeks. Reheat it in the microwave.


Layer the flavors and enjoy!

Not For the Faint Hearted!

Can you believe it? Your looking at SQUID! I actually learned to clean squid for my Northwest Seafood Paella. I have to say, this is not the way I really intend to get calamari in the future. I was so grossed out having to grab the squid by the head, encase you are noticing. . .the head is all eyeballs. . .YUCK!, and pull. Maybe I am just acting like a twinkie but Dang it! I don't LIKE pulling things out by their eyeballs!
All the guts are attached to the head and usually slide right out. I would like to say, usually. When they don't, you have to scrape them out. I went to a website called Squidfish.net to figure out just how to do this wisely. I learned a lot and this website shows you great how-to pictures. What really shocked me is that the outside skin of the squid wipes right off. The easiest part. I wanted calamari rings but after I realized that I was pulling the head and all attached innards out, well, I wanted to make sure the little creature was all the way clean, so I split it down the middle with my trusty knife. We had calamari strips.

I have always heard that calamari gets tough when you cook it but maybe in this recipe, there was the perfect cooking environment because the calamari strips were really tender. I wish I can't had to clean them first because I actually had issues with eating my Paella.

I was dying to participate in the one-pot cooking dish event but I am also doing college finals and working. . .so after making this dish at the last minute, well, I ran out of time! I happen to be pretty bummed because I wanted to share this recipe with everyone. I like the flavors AND. . .this part is really cool. . .this whole dish goes together in minutes IF you buy pre-cleaned calamari. Also, for the lobster tails, if it is affordable, get ones that are at least 6 ounces.

Don't be afraid of the seasonings either. This makes enough for 8 servings. I used my Cuisinart dutch oven to make this because the pot starts on top of the stove and moves to the oven to finish cooking. I froze leftovers because I want to make several other dishes this week and there is no way we can eat everything right this second. Hhmm, I do love having dinners in the freezer for later when I am completely swamped though. By the way, this is my Mom's recipe and I have no idea where she got it. I have new respect for her for the cleaning seafood part. Ooohhh, I didn't mention I cleaned my first Halibut fillet for this too. By the time I was done with this little 8 ounce fillet, there were so many jagged points going in every direction that the fillet actually looked like I gnawed the skin off with my teeth. Boy, did I forget to have Mom teach me a few things before leaving home.
Northwest Seafood Paella

Ingredients:
7 cups water
2 cups favorite white wine
1 1/2 medium onions, diced
2 green bell peppers, seeded and diced
2 T. garlic, minced
1/2 c. tomato paste
1/3 c. canned peeled tomatoes
1 1/2 t. black pepper
5 bay leaves
1/4 c. salt (you have a LOT of rice and seafood so this amount is not salty)
1/4 c. olive oil
2 c. beer
10 ounces medium shrimp, peeled and deveined
10 ounces medium scallops
10 ounces cubed firm-fish (I use Halibut or Salmon . . .any firm fish will do)
10 ounces cleaned squid bodies, cut in large rings
10 ounces boneless chicken breast, cut in strips
1 1/4 c. long grain rice
1 1/4 c. Valencia rice (this is short grained Spanish rice like Risotto. . .which will do fine. . .or look in the Spanish section of your grocery for short grain rice)
4 mussels
2 lobster tails, cut in half lengthwise


Directions:
Preheat the oven to 400 degrees R. Combine all the ingredients, except for the mussels and lobster, into a large cooking pot and stir well. Cook on stove top over high heat for 15 minutes. Add the mussels and lobster, cover, and place in the oven for 35 minutes. Uncover and serve.

Blog Archive